Welcome to my faux biscuit quilt tutorial! Or, an alternative method to making a biscuit quilt.
Why an alternative method? I wanted to make a biscuit quilt quick. Traditionally, biscuit quilts are made of individual small pillows or 'biscuits' that are then whip stitched together. This can be done by hand or machine, but either way it's a lot of time and work. I was also concerned about all the whip stitching. It just didn't seem secure to me. I started thinking about how I might speed things and avoid whip stitching. Here's what I came up with!
First, I took two pieces of fabric and stitched 3 sides together, stitched channels, stuffed a bit, stitched across, stuffed some more, etc, and came up with this:

It's pretty cool, has the soft squishiness I was looking for, but not really 'biscuity'. I learned on the net that this is more like 'pillow' quilting because the individual puffs are not pleated or gathered. Although this wasn't quite what I was going for, I think this is going to be a favorite squishy at our house. It's really versatile and can be folded up and made into lots of different shapes and thicknesses. I can see this making long car trips much more comfy....
Then I took two pieces of fabric and put several pleats in the top going both directions, stitched three sides, made channels, stuffed, stitched, stuffed, stitched, and came up with this:
Eureka! Soft and squishy and biscuity! So, now for the tutorial. Please note - math and exactness are not my thing. Sorry! I'm more of an eyeball it, guesstimate, and make the best out of how it comes out kinda stitcher. I'll do my best to give measurements and such, but I found this particular process to be fairly forgiving, so don't stress out with it.
Gather up the following:
backing fabric in the size you want your quilt to finish plus seam allowance - I used a solid flannel, any comfy fabric will do.
top fabric - it will be easier if you can find something that has lines, stripes, or some kind of linear pattern that you can use to help you pleat and sew. I used regular cotton fabric because I didn't have a flannel in that type of print.
stuffing - I think I used about 2 bags for mine. Hard to tell - I robbed a pillow I was tired of looking at.
thread, sewing machine, scissors and lots of PINS!
OK - first thing to do is pleat up your top fabric till it's the same size as your backing fabric. I started about 3 inches from the edge of my top and took about a 1 inch pleat every six inches with a goal of having biscuits about 5 inches square. You can make them any size, but it's a LOT easier to stuff them if you can easily slip your hand inside, so make your life easy and make them big enough to get your hand into! Start at one end of your fabric and pin the pleats up all the way to the other end putting a pin every six inches or so or more! I hate pins, but I like it when they make things easier. Pin all you like! Do the same the other direction and you should end up with something like this:

Another pic of this step:
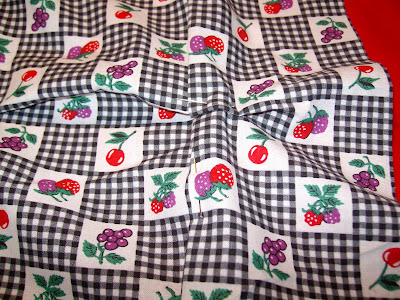
See the pleats running either direction? This checkered fabric made pleating easy - I just folded one fruit square over to meet the other! No measuring, no math!
If you are making a larger quilt, you may have to stitch some pieces of fabric together to make the top large enough. If you need some math, you will want to take the desired finished size of your quilt (should also be the size of the backing fabric), divide by how big your channels are (remember - big enough for your hand to fit into) and that should give you the number of channels you will have. Your backing fabric/finished size should be evenly divisible by the width of your channels. Add one inch for every channel and every row (for the pleats), add this to the finished size, and that is how big your top fabric needs to be. See why I hate math? If anybody has a suggestion for an easier way to explain that, I'm happy to substitute it for mine!
Next, put your backing fabric and your top right sides together - gingerly! - there are lots of pins hanging out in that top!

And stitch along three sides leaving the fourth side open. My backing and my top don't match exactly. I'm OK with that. If it bothers you, you can trim your backing to match your top. I would suggest doing this after you have stitched the three sides. Also, wait to trip the open side until just before the big finish.

Turn right side out - careful! Pins! and you should have this:

Now, stitch channels between your pleats. Starting at the end opposite the open end, stitch a seam about 5 inches (or whatever width you decided to make your biscuits) from the edge all the way to the open side. As you sew each channel you can remove the pins from that channel. This is my favorite part - I hate pins!

Repeat this all the way to the other side and you should end up with this:

Note - this is the back of the quilt - easier to see the channels. Oh, and that is my lovely assistant and future recipient of the quilt in progress. Did I mention a lovely assistant in the list of things you would need for this project? What does she have in her mouth now???
OK - baby rescued from dangerous small item, back to sewing.
Now it's time to start stuffing! Take a handful of stuffing (smaller or bigger, depending on how squishy/firm you'd like your quilt to be) and shove it all the way to the end of one channel. Repeat with all the other channels. When you have one handful of stuffing in each channel, stitch across them all about five inches from the end of the quilt remembering to stitch in your pleat in the middle of each channel, making the first row of biscuits. Your patterned fabric really helps here! Hard to get off track when you are sewing on the lines. It's OK if you sew over some stuffing and don't worry about making your pleats pretty, just take in the fullness. It doesn't even have to be one pleat, it can be two or more or even just sort of bunched up however you can get it sewn down. However you get it stitched in will work and won't make a hill of beans difference in the finished product. If you really want a perfect pleat, the patterned fabric will save your day!

Continue stuffing rows and stitching them in till you reach the end. After stitching your last row of stuffing in it's time to finish the edge. This is when you'll want to trim! I suppose you could bind it, but I chose to turn it twice and stitch it down like so.

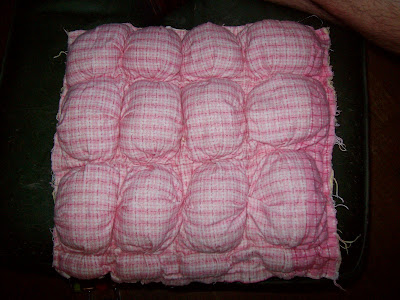
Just look at all those puffy, fluffy, squishy biscuits!

The finished product!


The finished product with the lovely assistant/happy recipient! Now what does she have??? Just a straw. Phew!


 So, there's a post for today. More tomorrow!


